When you combine a little bit of DIY knowledge with a canine enthusiast, you’ll find yourself losing your weekends while taking on dog projects to make your furry friend’s life more comfortable. Need to build a dog run? Perhaps a wheelchair for a disabled three-legged canine companion? Maybe you just need to look at a ramp or some steps to make getting around the house a little easier.
Each of the DIY projects we cover in this article is fairly easy for both advanced DIY’ers and beginners. You shouldn’t need to spend too much money to get any of these off the ground. Most materials you’ll need should be available at your local Home Depot or Lowes.
Let’s jump in and take a look at 10 great projects for your dog that you can start today.
Dog Crate Cover
Make a dog crate cover out of fabric. It’s easy and inexpensive! You can easily make a cover for any type of dog crate out of fabric if you follow the simple directions below. Best of all, it need not cost much!
Items needed
- Tape measure
- Pins
- Fabric
- Scissors
- Needle and thread or sewing machine
- Fabric glue (optional)
- Cording (optional)
Take Measurements
- Measure the crate surfaces.
- Areas to measure are the top, the left and right sides, and the front and back.
- Each will be covered by a separate panel of fabric that you later sew or glue together.
- Add an inch and a half (35 mm) to each panel’s width and length.
- This will make seam allowances and ensure your cover will not be too small.
- Put your measurements down on paper in the form of drawings.
- Clearly mark each panel area.
- If you have quad paper, you can do the drawings to scale.
- You can then cut the paper pieces out and try them in different combinations.
- This will help you in figuring out how much fabric you need.
Finding and Cutting The Fabric
If you’re adding the cover for warmth, find a quilt at a thrift store that you can cut up or an old sleeping bag or two. Be sure to have your measurements and measuring tape with you. Check twice to make sure that you’ll have enough fabric.
You can also buy quilted fabric or create your own insulating panels by taking two layers of fabric and putting batting in between them. If you choose to do this, pin and sew the three layers together so that you have a complete panel before you try and attach it to the other panels.
Use a piece of chalk to mark out the panels on your fabric. If need be, pin the fabric to a few layers of newspaper to keep it in alignment before you mark it and start cutting.
Sew or Glue the Sides Together
Here’s where you see how easy it is to make a dog crate cover!
- First, pin the pieces together inside out.
- Note that you will only attach the top end of the front panel – leave the sides unpinned to form a flap.
- Try the cover on the crate. Adjust as necessary.
- Sew or glue the side panels to the top piece and the back panel.
- Sew or glue the top part of the front panel to the top panel.
- Finish off the seams along the edges of the front flap.
- Put two strips of velcro (the hooked part) on the top panel.
- Roll up the front panel.
- Add the other half of the velcro strips to it, so they match up with the ones on the top panel.
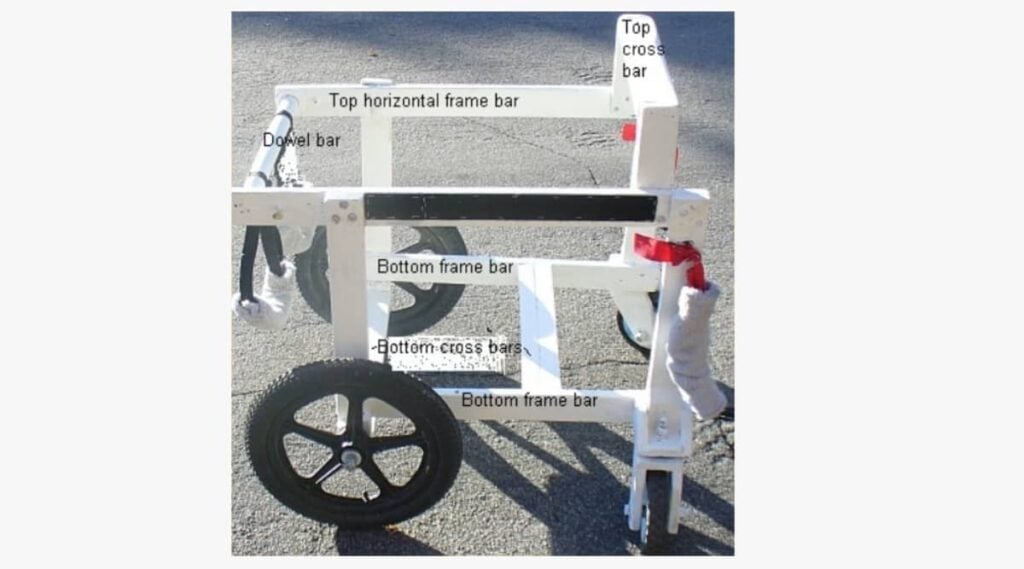
PVC Dog Chariot
If your pup has lost the use of their back legs, creating a dog cart out of PVC is a cheap and reliable option to help assist with their mobility. Below are a couple of different ways that you can do this on a budget. The video above will walk you through cart creation step-by-step, or you can follow either of the two plans outlined below.
Michael Marcus Dog Cart Plans
The drawings and full plans can be found here. A link to them can also be found on the Columbia River Newfoundland Club website. Michael discovered that building the platform was easy but that the wheels and axle were the most challenging part.
He also mentions you may have to adapt the height of the shafts according to the size of the wheel you use and the type of harness your dog wears.
More About The Wheels
To keep costs down, try to scrounge wheels off old bicycles or wheelchairs. Wheels are sized according to the outside diameter of the tire, and common bicycle sizes in the U.S. are 20, 24, 26, and 27 inches. Wheelchair wheels are usually 24 inches*
- Make sure your wheels match, i.e., don’t use a front and a rear or two different size wheels!
- Use front wheels where possible since rear ones contain unneeded gears.
- Be sure the wheels move freely on their axles without much wobble.
- If they do wobble, check for broken or loose spokes.
- Use a spoke tool to tighten them or ask a bike mechanic to make adjustments.
- Check to see if the wheels still have all their bearings.
- Make sure you have nuts to fasten onto the cart axles.
- Knobby tires and thicker tubes are more resistant to punctures.
- Quick-release wheels will make it easy to disassemble the cart for stowing or transportation.
Angie Meroshnekoff’s Plans
Angie Meroshnekoff adapted Michael Marcus’ plans to build a dog cart using PVC while sticking to a strict budget. She utilized discarded wheelchair wheels but suggests you can use 20-inch bicycle wheels if a smaller dog will pull the cart. Her instructions and detailed photos are very clear.
Love Your Dog’s Dog Chariot Plans
When the owners of LoveYourDog acquired the site, we also acquired plans of our own for some detailed instructions on a PVC dog cart. You can download them for free right here.
*Original credit to these plans goes to Stan and Johanna Soliday of make-and-build-dog-stuff.com. The LoveYourDog.com team acquired this website in 2021 and decided to make these plans free to dog owners here in this guide.
Dog Wheelchair
Love Your Dogs also has access to a free wooden quad design, the Doggie Buggy. This is for larger dogs that serve to rehabilitate dogs that have lost the ability to support themselves. This can be made for less than $150 in parts from most home improvement stores.
For smaller dogs needing four-wheel support, you can use the same design but on a smaller scale.
*Please note: Any of these can be built for less than the amounts stated depending on the materials you have on hand or are able to scrounge and the wheels you use.
What This Plan Provides
- Our wheelchairs are adjustable.
- Detailed instructions and photos so that anyone familiar with basic tools can build these.
- We let you know how much of each part to get, where to buy them, and which items you can substitute.
- An ability to create a cheaper alternative to commercial dog wheelchairs
According to a blog post by veterinarian Andrew Jones of Nelson, British Columbia, dated November 21, 2012, dog paralysis has been reversed in some cases. Cells from the lining of the dogs’ nose cells were taken and cultivated in a special way, then injected back into the dogs’ spinal columns at the point where they were injured.
All the dogs treated this way improved significantly because nerve cells were stimulated to grow. Wheelchairs were initially used as an aid. They were able to walk on a treadmill using a supporting harness some months later. You can download free plans for this right here.
*Original credit to these plans goes to Stan and Johanna Soliday of make-and-build-dog-stuff.com. The LoveYourDog.com team acquired this website in 2021 and decided to make these plans free to dog owners here in this guide.
Cedar Dog Bed
Creating a Cedar filled dog bed is extremely easy. All you need to do is buy zippered pillowcases and fill them with cedar shavings. This is easier for smaller dogs. Bigger dogs will need a larger pillowcase and more cedar shavings. To save money, find your pillowcases at the thrift store. Cedar can also help keep fleas away.
Cleaning is easy. Just remove the pillowcase and wash it. You can dump the shavings out every couple of weeks, and throw them away or use them for a fire kindle if you have an outdoor fire pit. They can also be used inside a chicken coop if you have one. This is a cheap and efficient way to make a DIY dog bed, which is great if you have multiple dogs or rescue.
Allergy Disclaimer
Some dogs may be allergic to cedar shavings, so it might be true that this would not work for all dogs inhabiting a shelter. They may be less likely to be monitored on a frequent basis compared with a dog living with someone.
Of course, it would depend on the shelter, the number of people working or volunteering, and their expertise. And there are also many dog owners who do not have experience with dog allergies. At any rate, it sounds like it would be wise to keep an eye on your dog once you change to this type of bed.
*Symptoms could include frequent sneezing, coughing, watery eyes, or even difficulty breathing.
Dog House
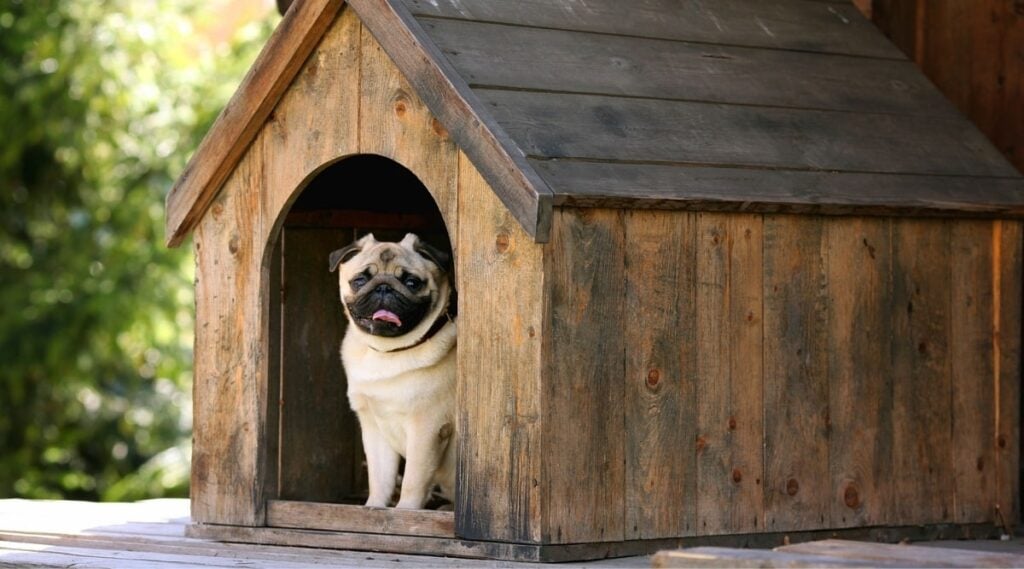
Building a dog house yourself can save you money while keeping your dogs (or cats and other critters you want to protect) out of the weather. However, if you’re short on time, it may be just as effective to buy one. Whether you build a dog house or buy one, there are many opportunities for adding your own creative touch – you can make it as plain or fancy as you like!
Start With a Plan
Preparation includes measuring your dog and finding a suitable space for the dog house. Reading up or watching videos on building a dog house before you begin is likely to result in a more satisfactory product.
If you don’t know where to start, see below for some of the good plans available. We’ve tried to organize them so you can quickly compare which one(s) may work for you. Some free sets of plans we recommend:
Basic Things to Consider
A well-built dog house:
- Is sized to fit your dog, but not too big*
- Provides adequate ventilation for either warm or cold seasons
- Has good insulation for colder seasons and climates
- Has a wind partition for severely cold climates
- Is easy to clean via a removable or hinged roof
- Sets up off the ground
- Is built of non-toxic materials in places a dog might be able to chew
- Complies with local building codes
*Recommended Minimum Dog House Sizes
- Highest point of roof = top of dog’s ears + 3 inches [75mm]
- Lowest point of roof = top of dog’s shoulders + 3 inches [75mm]
- Length = dog from nose to tail + 12 inches [300mm]
- Width = dog stretched out on side from claws to the top of head + 6 inches [150 mm]
- Doorway = wide enough for the dog’s widest point + 1 inch on either side [25 mm each side]
- More Information On Building a Dog House
- Here are some ideas regarding insulating a dog house.
In an unshaded yard, your dog may appreciate a covered porch attached to his or her dog’s house. A dog house is set up off the ground to keep the bottom dry and keeps crawly critters and dirt out. You may wish to cover the floor of the dog house to make it more comfortable for your dog. An old quilt, foam pad covered with vinyl, rubber matting from a car salvage yard, old carpet, or straw are some possibilities.
Dog Treadmill
We recommend building your own treadmill as an alternate form of exercise for days when the weather is too foul for long walks or bike rides. Originally created by the owners of make-and-build-dog-stuff.com, these plans are now free for use. This DIY doggy treadmill will help you create the perfect treadmill for your pup.
The Doggie Runner treadmill plans or blueprints include CAD drawings, detailed photos, and written instructions. One of the best features of this design is that you or your dog have manual control of the treadmill, i.e., you can speed up or slow down at will.
Tips When Building Your Dog Treadmill
- Be sure the treadmill surface is long enough for your dog.
- A medium-sized treadmill, like our design, accommodates dogs up to about 85 lbs.
- A bigger dog may have trouble going faster due to the length of their stride.
- Each end needs some type of roller for the smooth operation of the belt.
- The frame can be made out of metal or wood.
- You may be able to get away with just a platform for the dog to run on.
*Original credit to these plans goes to Stan and Johanna Soliday of make-and-build-dog-stuff.com. The LoveYourDog.com team acquired this website in 2021 and decided to make these plans free to dog owners here in this guide. You can download this guide for free right here.
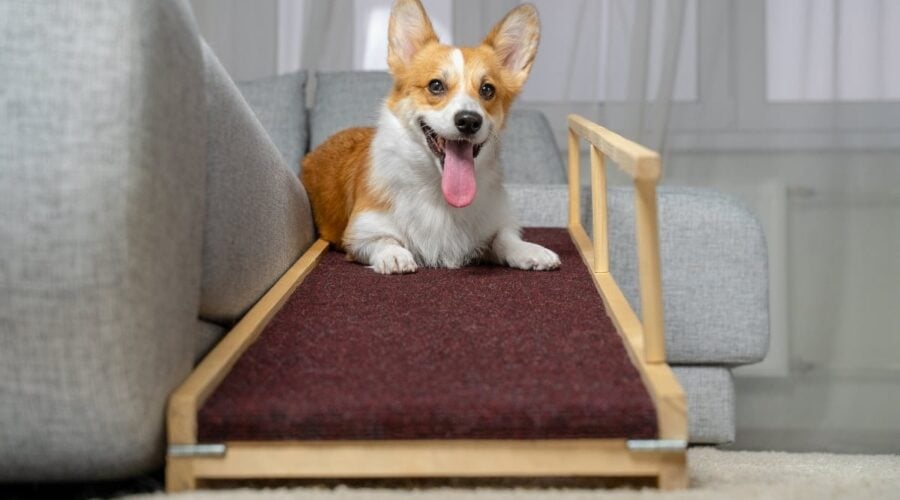
Dog Ramps

Build a dog ramp to cover steps with this easy plywood design. Is your dog having difficulty managing the stairs into or out of the house? We have a simple solution for you – build a dog ramp! These easy steps will have your pup working their way up and down where you need them to go in no time!
Design Considerations
Before you start to build, there are some things to consider:
- How big and how heavy is/are the dog(s) who will use the ramp?
- Will the ramp be for indoor or outdoor use?
- Will the ramp be freestanding or supported?
- How often will you need to move the ramp?
- How many ramps will be needed?
- Do you have any materials on hand that you could use?
Measurements
- Length: Measure the distance from the top of the stairs to the bottom and add 4 inches [100 mm].*
- Width: We suggest a minimum width of 16 inches [405 mm]
*If the slope will be too steep for your dog to handle, add more length until you are comfortable with the angle.
Materials
- At least 3/8″ thick [10 mm] plywood or the equivalent for dogs up to 50 lbs, and 1/2″ [12.5 mm] or 5/8″ [16 mm] for heavier or multiple dogs.
- If you don’t have sufficient length, combine pieces by placing a thick board underneath the join and screwing the pieces to it.
- Spar varnish or polyurethane to waterproof the board.
- Wood or drywall screws.
- Lathe strips equal to the width, to be spaced approximately 14″ [355 mm] apart.
- Indoor-outdoor carpeting is equal to the length and width measurement.
Tools Required to Build a Dog Ramp
- Tape measure.
- Hand or power saw (or get the wood cut to size at the lumberyard or hardware store).
- Staple gun with 1/4 inch (6mm) staples or strong, waterproof glue.
- Power screwdriver or hand screwdriver with phillips head.
Building a Dog Ramp from Plywood
- Staple or glue the carpeting to one side of the plywood.
- Starting from the bottom, attach lathe crosswise over the carpeting at regular 11 inch (275mm) intervals.
- Move the ramp to one side of your steps.
- Overlap the top part of your plywood with the top step by a few inches.
- Screw it in place, using the 1 inch screws in a zigzag pattern. Add wooden shims underneath to close the gap if need be.
- If your top step is made of concrete instead of wood, you may need a different fastening method, such as concrete anchors or special concrete nails.
That’s it – you now know how to build a dog ramp! Now it’s time to have your dog test it out. It may take some time to get your dog fully used to use their ramp on a regular basis, so make sure you are patient as your dog starts to get more comfortable with it.
*Original credit to these plans goes to Stan and Johanna Soliday of make-and-build-dog-stuff.com. The LoveYourDog.com team acquired this website in 2021 and decided to make these plans free to dog owners here in this guide. You can download both sets of dog ramp guides below.
Doggy Bridge: 3D Layout and Drawings
Doggy Ramp: Plan Drawings
Dog Steps
Similar to building a ramp, building some steps for your dog can come in handy, when you need your dog to climb up and down specific surfaces. The guide below will walk you through the materials you’ll need, and the video above is a step-by-step example of how DIY dog steps can be built.
Building Your Dog’s Steps
Below are the following materials you’ll need to build a proper set of doggy stairs. Most of these items can be purchased at your local tool or home improvement store. Costs will vary, but you “should” be able to build a set of stairs for less than $100.
- Materials You’ll Need: For this project, you’ll only need Plywood, Carpet, Fasteners, and some basic tools.
- Tools You’ll Need: Tape Measure, Power Saw, Phillips head screwdriver, Staple Gun, Hammer, Carpet Knife.
Once you have the materials you’ll need, you’ll need to start cutting the wood and utilize your tools to assemble the stairs. Rather than lay out a full DIY guide, check out the guide over at build-basic.com for additional details on the easiest way to fashion a great set of stairs. We recommend carpeting them to make it easier for your dog to go up and down.
Elevated Dog Feeding Station
Looking to give your pup a way to eat food off the floor? For some larger breeds, bloat can become a real problem. Many giant breed dog owners choose to feed their dogs from an Elevated Feeding station in order to minimize the risk of bloating.
Depending on the style of Elevated Feeding Station you are looking to build, there are many different plans to choose from. We prefer the farmhouse look, and Shanty2Chic provides some excellent guidelines for building just that in the video above.
- Materials You’ll Need: Wooden Boards, Flat Head Screws, Paint or Stain
- Tools You’ll Need: Jigsaw or Power Saw, Pencil, Paintbrush, Measuring Tape
Once you have the needed materials, it’s as simple as following the instructions. Rather than lay them all out here, you can check them out at Shanty-2-chic for additional information.
Dog Hair Remover
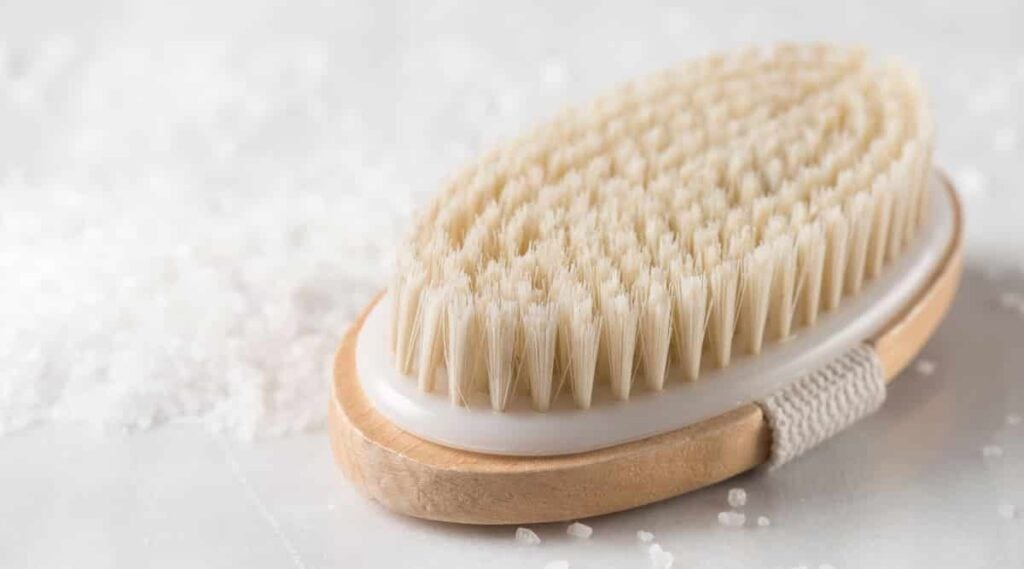
You might think it’s easier just to buy a lint roller and be done with it. But the little-known fact, most lint rollers actually stink at pulling out dog hair. There are other easier and more effective ways of getting rid of dog hair without going through endless supplies of lint rollers.
The Homemade DIY Trick
- Take any size scrubbing brush.
- Dampen it.
- Rub in light strokes across the carpet.
- Remove hair periodically with a comb or with your fingers.
- Wash brush in soapy water, rinse and let dry till the next use.
Believe it or not, a bathroom scrubbing brush can make the PERFECT dog hair removal tool. You can use one of these by following the steps below.
Final Thoughts
Now that you’ve looked over these ten different DIY dog plans, you’ll have plenty to keep you busy this weekend. If you have some do-it-yourself blood in your body, most of these shouldn’t take more than a weekend’s work in order to get them up and running for your pup.
While some of them may be cost-saving techniques, others are just for fun. No matter the reason, each of these projects will show your canine companion how much they mean to you. For more DIY dog tips, check out our favorite DIY dog sweater knitting ideas, DIY dog clothing patterns, DIY shampoo recipes, and DIY dog costume ideas.