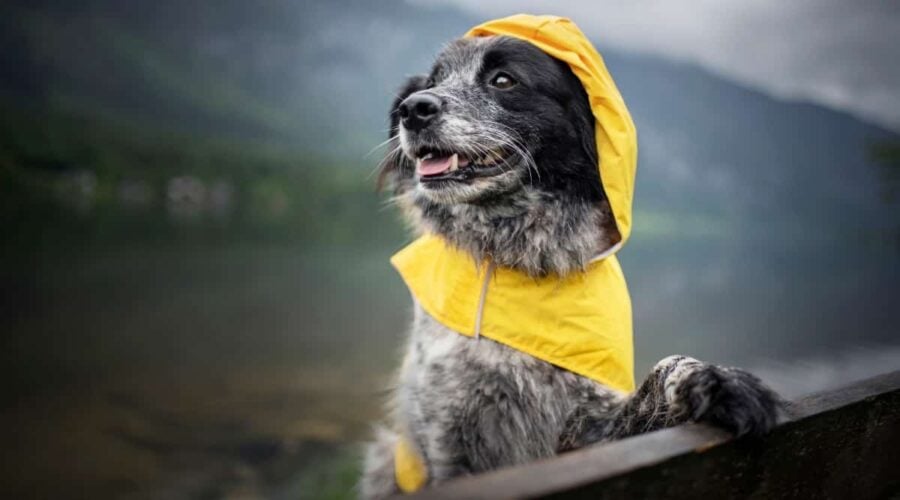
Looking for a free DIY dog project to pass the weekend time? How about a homemade dog shirt or a raincoat? These patterns will keep you busy while showing your canine companion how much you care about them! From raincoats to shirts, there are plenty of different options you can create to keep your pup warm or dry, depending on the occasion.
These sewing patterns may not help you build a ramp or a set of dog steps, but you’ll definitely be the talk of the dog park when your pup comes in with a handmade sweater, shirt, or raincoat. You can use many different types of material, which will allow you to pick from many different textures or colors for your pup.
Without further delay, let’s jump in and take a look at both the clothing patterns you can use for your pup and some DIY Dog Raincoat ideas you can use as well!
Free Clothing Patterns
For the first of our free online dog clothes patterns, a dog shirt, we suggest you print out the picture and instructions below that show which measurements to take.
You can also view this YouTube video below that shows a woman measuring her dog and creating a pattern. She points out that there can be a difference of 1 to 2 inches (25 to 50 mm) when you measure your dog’s back sitting vs. standing.
Instructions For Taking Measurements
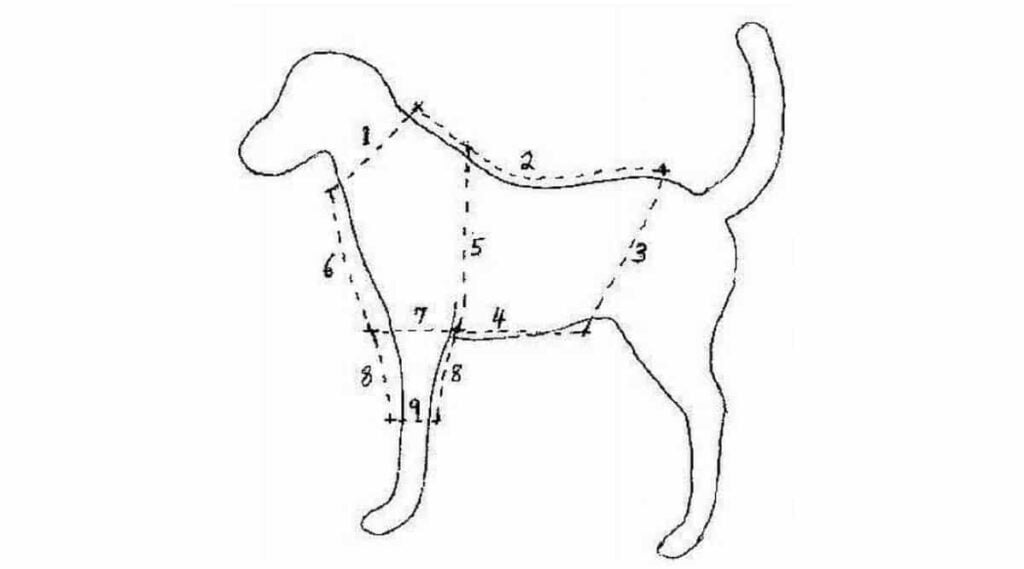
Use a pencil to mark down the following. You’ll want to write out or print a few of these, just in case you make a mistake on your first run. The measurements below are important to get in order to get your dog’s clothing a proper fit.
1 _________ Collar measurement
2 _________ Collar to 3 inches (75 mm) before the base of tail
3 _________ Base of tail to flank
4 _________ Flank to back of front leg
5 _________ Withers (top of shoulder) to back of front leg
6 _________ Neck to chest to breastbone
7 _________ Widest part of leg. Add an inch (25 mm) towards the front
8 _________ Length of sleeve. Add 1/2 inch (12 or 13 mm) for the hem
9 _________ Bottom of sleeve. Add 3/4 inch (18 mm) to the width
Note that this is not as tailored as the instructions shown in the YouTube video. However, it should do well for a temporary project, such as a costume for your dog.
Dog Shirt Instructions
It starts by having you create a pattern outline from the newspaper that you custom-fit to your dog. Then you add the remaining pieces. Once you have a successful set of pattern pieces, they can be re-used to create as many dog shirts as you’d like. See the video above for a step-by-step example before starting on the steps below.
Suggested Steps
Read through all the directions on this page first before starting. While this pattern is not printable, you can use it as a guide while you start cutting the fabric for your pup’s shirt.
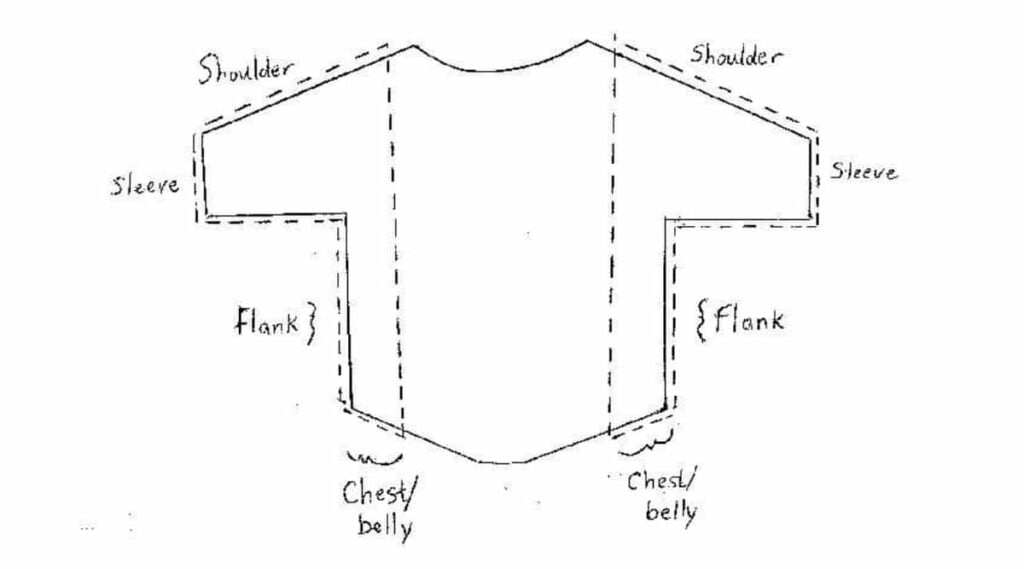
Top Of Shirt (Dog’s Back)
This is marked by the solid line in the image above.
- Tape two sheets of newspaper together lengthwise.
- Fold them in half along the taped edge.
- Draw half the pattern for the top part of the shirt.
- Cut around the pattern through both layers of the newspaper and open it out.
- To ensure proper fit, pin an old pillowcase or sheet to the pattern, and cut it out.
- Drape it over your dog to check. Mark where you want to hem the edges and pin them.
- Check it on your dog once more (easier with a helper).
- Once you’re satisfied, pin the pattern to the fabric you plan to use, then cut around it.
Bottom Of Shirt (Front)
You will make two separate pieces that attach to the top shirt along the flank, sleeves, and shoulders and fit under your dog’s neck and belly. See the dotted line in the image.
- Pin your fabric for the bottom piece to the top shirt pattern.
- Use the same solid outline for the flanks and sleeves sections.
- Add about an inch more (25 mm) in height to the shoulder sections.
- Measure the distance between the top of your dog’s leg and where it meets the body.
- Measure down to the middle of the breastbone between the front legs.
- Add two inches for piece no. 1 to the measurements you just made
- Next, add one inch for a piece no 2.
- You will want to overlap them underneath your dog’s neck and chest.
- When satisfied with the dimensions, cut the fabric out, and pin it to the top part.
- Check for fit on your dog and make adjustments as needed.
- Finally, sew the seams together and hem the edges.
- Add any type of collar you choose this could be a wide collar as in a man’s shirt.
- It could also be a piece of lace or else a strip from your fabric to make a binding..
- We encourage you to experiment!
- Use Velcro or buttons to fasten the front pieces together under the neck and belly.
Thank you for viewing this page concerning free sewing patterns for dog clothes. We hope it has been helpful to you in creating a shirt for your dog.
DIY Dog Raincoat Patterns
This pattern is also perfect for making waterproof dog coats for winter snow. The vinyl keeps your dog’s fur from getting wet, so you dry only the exposed parts, which is a real-time and labor saver and keeps the dog from getting chilled. This waterproof material easily wipes clean and dry. The video above will give you a step-by-step.
Materials Needed
- Vinyl upholstery cloth or a suitable waterproof cloth.
- Length = Length of your dog from head to base of the tail.
- Width = circumference of your dog from the neck down to behind the front legs.
- Scissors for cutting cloth.
- A black marker or another fabric pen for marking cloth.
- Velcro, 1-2 inches (25-50mm) wide; 14 inches (355mm) long.
- Get the sew-on kind, or plan on adding a waterproof glue to the adhesive kind.
- Needle and thread to match the outside of the cloth
Measuring Your Dog & Creating The Pattern
- Measure from between your dog’s shoulder blades to the top of the breastbone.
- Measure along the dog’s back from the collar to the base of the tail.
- Adapt your dog’s measurements to the pattern: each square is 1×1 inches (25x25mm).
- Draw the grid on the underside of your cloth with a marking pen.
- Transfer the design to your grid, block by block.
Cutting and Fitting The Vinyl
- Cutting the vinyl of the dog raincoat.
- Cut out the design.
- Have your dog stand, using a helper if need be.
- Place the cutout design on your dog.
- Fold the flaps the way they will be when fastened, and use tape to hold them.
- Note any adjustments that need to be made with your marker.
- Do any additional cutting needed.
- Fold the edges of your material over and sew a 1/4 inch (6mm) seam all the way around.
Adding The Velcro
- Cut pieces of Velcro 2 inches (50mm) long and trim the corners to make oblongs.
- You can also cut your Velcro patches to the size and shape you want.
- Pin or press one-half of each patch (fuzzy or hook side).
- Pin or press the other half of the Velcro patches in the proper places and try them out.
- Sew or glue them on once you’re sure of the correct placement.
Adding The Hood
- For the bottom edge of the hood, copy the paper pattern for the bottom edge.
- Just measure along the coat you just made.
- Hem this edge, then either sew the collar onto the coat body, wrong sides together.
- For the hood, copy the design from the photo or make up your own design.
- Hem all the way around.
*Apply Velcro on the right or wrong side of the homemade dog raincoat to match the three spots on the hood. Try it out before sewing or gluing the Velcro permanently.
Final Thoughts
By now, you should be well on your way to creating a dog coat or a brand-new shirt for your pup. All of these designs can be reused with multiple color options and multiple textures or fabrics. If you’re looking for some doggy sweaters, take a look at some of our DIY dog sweater ideas to keep your pup warm during the winter. We hope you’ve enjoyed it, and please make sure to share these patterns with other dog lovers you may know!